
How Automated Registration Speeds Up Patient Intake
Healthcare Technology
Updated Mar 28, 2026
Slash check-in times, reduce intake errors, and speed revenue cycles with automated patient registration and EHR integration.
Automated registration systems are transforming patient check-ins by replacing repetitive paper forms with digital workflows. These systems save time, reduce errors, and improve both patient and staff experiences.
Key Insights:
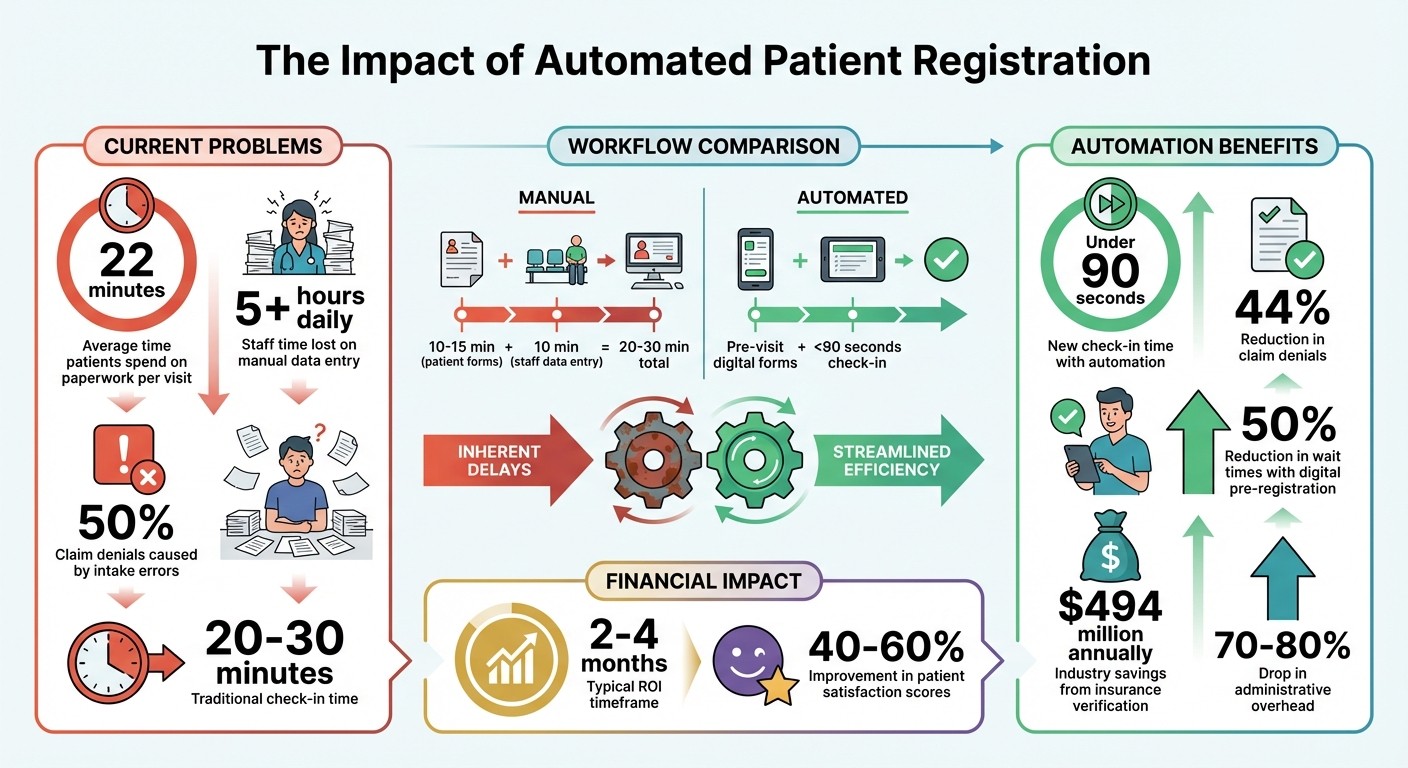
Patients spend 22 minutes per visit on paperwork, while staff lose over 5 hours daily on manual data entry.
Up to 50% of claim denials stem from intake errors, like misspelled names or outdated addresses.
Automated systems cut check-in times from 20–30 minutes to under 90 seconds and reduce claim denials by 44%.
What They Offer:
Digital pre-registration: Patients complete forms before arrival, reducing wait times by 50%.
Insurance verification: Saves the industry $494 million annually by minimizing denials.
AI-driven tools: Handle scheduling, triage, and communication, freeing staff for more critical tasks.
Results:
Practices see ROI within 2–4 months, with administrative overhead dropping by 70–80%.
Metrics like check-in time, error rates, and patient satisfaction improve significantly.
Switching to automated registration doesn’t just save time - it ensures accuracy, enhances efficiency, and improves patient satisfaction.
Automated Patient Registration Impact: Time Savings, Error Reduction, and ROI Statistics
Automate Healthcare Workflows From Patient Onboarding to Digital Support Ticket Triage
Step 1: Review Your Current Patient Intake Process
Start by mapping out your entire patient intake process, from the moment a patient schedules an appointment to their actual visit with the provider. Document each step - whether it's an inquiry, booking, form completion, or data entry into your EMR system. Identify which staff members are responsible for each task, such as intake coordinators, front desk staff, or nurses. This will help you spot areas where responsibilities overlap and where bottlenecks may occur [3].
Document Your Current Workflow
Break your workflow into key stages: Referral Received → Patient Contacted → Documents Submitted → Insurance Verified → Treatment Start [3]. For each stage, note the tools or methods used, such as paper forms, phone calls, or manual EMR entry. Be specific about the type of information collected, like patient demographics, medical history, insurance details, and consent forms [4][6].
In a typical manual setup, patients often spend 10 to 15 minutes filling out paper forms in the waiting room, while staff spend an additional 10 minutes per patient manually entering that data into the system [5]. This adds up quickly in terms of lost staff hours and administrative costs.
"Manual data entry has error rates between 1% and 4%. For a practice seeing 30 patients a day, that means one to four records with problems every single day."
Once you've mapped the entire process, you can start identifying where delays are happening.
Find Where Delays Occur
Use your workflow map to locate the stages where delays are most frequent. For example, the time patients spend completing forms in the waiting room can create a ripple effect, delaying appointments throughout the day. Just three late starts at 9:00 AM could result in a 30-minute delay by lunchtime [5].
Also, take a close look at system integration issues. Are staff manually transferring information between your EHR, scheduling, and billing platforms? This can lead to skipped fields, illegible handwriting, or incomplete medical histories, all of which may require follow-up calls and cause billing delays [3][4]. If you're using digital forms, track where patients abandon the process to identify confusing or unnecessary questions [3].
Collect Baseline Performance Data
Before making any changes, gather baseline metrics to measure your current performance. Track key data points like:
Registration time
Wait times
Data entry error rates
Form completion rates
Staff hours spent on administrative tasks
Additionally, measure the percentage of patients who fully complete all required fields on forms. Record patient satisfaction scores related to the intake process, and monitor no-show rates to see if intake challenges are contributing to missed appointments [1][3][5]. These metrics will serve as a benchmark to evaluate how automation impacts your practice's efficiency and patient experience.
Step 2: Select an Automated Registration System
Choose a system that directly addresses your process bottlenecks. The right platform should streamline workflows by cutting down manual data entry, minimizing errors, and syncing effortlessly with your existing technology setup.
Key Features for Healthcare Registration
An effective automated registration system should manage the tasks that take up the most staff time. It's essential to have bidirectional EHR integration with platforms like Epic, Oracle Health (Cerner), athenahealth, and MEDITECH. This eliminates manual entry errors and ensures seamless data flow between systems [5].
Modern platforms go beyond basic form collection. Look for AI-powered tools that utilize natural language processing to handle triage, scheduling, and even prescription refills through voice or text. Real-time insurance verification is a must - eligibility checks against payer databases can significantly reduce claim denials. Administrative errors, which account for over 60% of claim denials, cost U.S. providers around $262 billion annually [8].
Digital forms should include conditional logic and required fields to guarantee complete and accurate submissions. A mobile-first design is critical, as 77% of patients prefer filling out demographic and insurance forms digitally before their visit [7].
Your system should also operate 24/7, offering round-the-clock scheduling and multilingual support. Automated patient communication via SMS, email, or messaging platforms can cut no-show rates by as much as 25%.
Finally, ensure the system complies with HIPAA regulations, holds SOC 2 Type II certification, and adheres to HL7 FHIR data standards for secure and standardized data exchange.
Lead Receipt delivers these features seamlessly, tailored specifically for healthcare providers.
How Lead Receipt Supports Healthcare Providers

Lead Receipt offers solutions designed to help healthcare organizations automate patient intake without increasing staff workload.
Professional Plan: Priced at $750/month, this plan includes a 24/7 AI voice and chat receptionist with a dedicated line supporting five languages. It can handle up to 100 AI calls daily and provides lead data output, call recordings, and priority support.
Enterprise Plan: Ideal for larger practices or multi-location organizations, this customizable option includes unlimited calls, integrations, and a dedicated AI consultant to map workflows. It also offers enterprise-grade compliance certifications and VIP support.
Both plans focus on automating workflows and integrating with existing systems like CRMs, scheduling software, and billing platforms. Lead Receipt’s AI can manage transactional tasks, such as appointment scheduling and insurance inquiries, while escalating more complex cases to human staff.
Pricing and Long-Term Planning
Vendors generally charge between $300 and $800 per provider per month, depending on practice size and volume. However, the savings from reduced staffing needs can be substantial. For example, implementing an AI receptionist can cut front-office staffing requirements by up to 60%, saving a mid-sized practice between $80,000 and $120,000 annually [8].
Systems with real-time insurance validation can also reduce claim denials by up to 40%, speeding up the revenue cycle. With an average payback period of four to six months and a three-year ROI often exceeding 300% [8], these systems can be a smart financial move.
Most vendors require a setup period of two to four weeks, followed by an optimization phase of 60 to 90 days. During this time, allocate resources for staff training, testing, and workflow adjustments. Choose a vendor with transparent pricing - avoid hidden fees for transactions or integrations - and ensure the platform can scale with your practice's growth, whether you're expanding a single location or managing multiple sites with standardized workflows.
Once you’ve confirmed your budget and scalability needs, proceed with integration and testing.
Step 3: Install and Connect Your Automated Registration System
Now that you've selected your solution and mapped out the process, it's time to install and integrate the system. The goal? A smooth data flow from patient submissions directly into your EMR, with zero manual intervention.
Connect to EMR and Other Systems
Start by assessing your EMR's API capabilities. For cloud-based systems, use their documented APIs. For older systems, you may need to develop custom integration layers to bridge the gap.
Map every intake field to its corresponding field in the patient chart. Pay close attention to details like insurance policy numbers, NPIs, and demographic data to ensure they align with your EMR's format.
Your system should populate data in real-time, triggering actions like insurance verification or staff alerts immediately. This eliminates manual data entry, which can take up to 15 minutes per patient and is often error-prone.
"A form isn't useful if it just sits in someone's inbox. It should push data directly into your system, create or update patient records in real-time, and be visible to the right team members instantly."
Make sure your system is HIPAA-compliant with features like end-to-end encryption and audit trails for every action involving protected health information. Before going live, let your developers test the integration in a sandbox or test version of your EMR to confirm everything works as expected.
Run a Test Program
Before rolling out the system across your practice, run a pilot program with a small group of patients. This trial phase is critical for identifying and fixing any workflow issues.
Test the system on various devices to ensure smooth functionality and verify that conditional logic works as intended. Keep an eye on where patients abandon forms - if certain questions cause drop-offs, consider rephrasing them or breaking them into simpler steps.
Set up a process for handling exceptions, like failed insurance verifications or missing documents. Addressing these issues quickly can prevent delays and reduce rework costs [9].
A successful test run sets the stage for smooth staff training and a full-scale launch.
Train Your Staff
Once testing is complete, focus on preparing your team. Automation will shift front-desk duties from repetitive data entry to more meaningful tasks, like patient support and care coordination.
"This isn't about replacing staff. It's about freeing them up to do work that actually requires human skill, like calming a nervous patient, managing a difficult case, or building rapport during in-person visits."
Dr. Shitel Dineshbhai Patel, CEO, Ad Vital Software
Train your staff to monitor dashboards, address system triggers, and follow clear escalation protocols for unresolved issues. Use real-life examples, like denied claims, to show how the system prevents errors that used to cause delays or extra costs.
Schedule quarterly training sessions to keep your team updated on payer policies, documentation standards, and system changes. Providing standardized scripts can also help staff explain the benefits of the new digital intake system to patients who may be wary of using technology.
Step 4: Track Results and Improve Performance
Once your automated registration system is up and running, it’s time to evaluate how well it’s performing and tackle any issues right away. The data collected by the system will help you pinpoint problem areas for patients, measure how much staff time has been saved, and identify workflow steps that still need adjusting. These insights will guide you in refining your processes across the board.
Performance Metrics to Track
Start by monitoring check-in times and form completion rates. Compare these numbers to the baseline data you gathered in Step 1 to see where improvements have been made.
Keep a close eye on your registration error rate. The industry standard is 1–2% [9], and it’s a critical metric because errors during registration and eligibility checks account for 35% of healthcare claim denials [9]. Additionally, track your Days in Accounts Receivable (A/R); practices that perform well typically keep this under 30 days [9].
Patient experience is another key area to monitor. Look at metrics like Patient Satisfaction Survey (PSS) scores, Net Promoter Scores (NPS), and no-show rates. Long wait times can hurt satisfaction - studies show that when wait times exceed 20 minutes, patient satisfaction drops, and about 30% of patients have left practices due to excessive waiting [11].
Use Data to Make Improvements
Dive into your analytics dashboard to spot form fields with high abandonment rates [3]. If certain fields are causing patients to drop off, consider simplifying or rephrasing them to make the process smoother.
Experiment with A/B testing to fine-tune communication strategies. For example, test different subject lines, message platforms (like SMS vs. WhatsApp), and timing for appointment reminders. A small tweak, like sending reminders 24 hours versus 2 hours before an appointment, can significantly increase form completion rates [3].
Keep an eye on your exception queue for cases where automation fails or flags data inconsistencies. For instance, in April 2022, a hospital partnered with MBW RCM to address skipped insurance verification steps, which occurred 12% of the time. By fixing this issue, the hospital reduced its Days in A/R from 45 days to 28 days [9]. Regular audits of these exceptions can uncover recurring technical problems or payer-specific requirements that need to be addressed.
Set Service Level Agreements (SLAs) to ensure patients don’t get stuck in any stage of the intake process. For example, if a patient remains too long between "Insurance Verified" and "Assessment Scheduled", an automated alert can escalate the case to a manager [3]. This proactive approach keeps the workflow moving.
After making these improvements and optimizing performance at one site, you can apply the same strategies to other locations.
Expand to Other Locations
Once you’ve fine-tuned your system and achieved better performance metrics, consider rolling it out to additional departments or clinic sites. Using a single platform to standardize forms, data fields, and workflows ensures consistency in patient experiences and simplifies staff training [5].
With tools like Lead Receipt’s centralized dashboard, you can compare performance metrics across locations side-by-side. If one site has lower form completion rates, investigate possible causes like communication breakdowns, staffing shortages, or technical glitches [3].
Most practices see a return on investment in intake automation within 2–4 months [10]. As you expand, you could see administrative overhead drop by 70–80%, while patient satisfaction scores improve by 40–60% [10]. These gains free up your staff to focus on what matters most: connecting with patients and addressing their concerns during in-person visits.
Conclusion
Automated registration is reshaping how healthcare practices manage patient intake. By moving forms to digital platforms that patients can complete before their visit, check-in times drop drastically - from 20–30 minutes to under 90 seconds [2]. This shift doesn’t just improve efficiency; it saves staff hours. For example, losing just 10 minutes per patient with manual intake can add up to over 4 hours of staff time in a day with 25 patients [11]. Reclaiming that time can mean fitting in 2–3 additional appointments daily [11], allowing your team to focus more on patient care.
The four steps outlined here ensure smooth implementation and measurable outcomes. The numbers speak for themselves: Lead Receipt equips healthcare providers with tools like 24/7 AI-powered support, direct EMR integration, and automated patient reminders, streamlining the entire process. Many practices see a return on investment within 2–4 months [10], while cutting administrative overhead by 70–80% [10].
Start small - perhaps with one department or location - while tracking baseline metrics. This data will guide improvements and make scaling up easier. With 1 in 5 patients admitting they’ve switched doctors due to long wait times [11], the stakes are high. Automated registration not only boosts efficiency but also strengthens patient satisfaction and loyalty, making it a win-win for both practices and their patients.
FAQs
What should I automate first in patient intake?
The initial move in automating patient intake is digitizing the process of collecting patient information. By using digital forms and online registration, you can cut down on manual data entry, reduce errors, and make onboarding smoother. Patients can fill out personal details, medical history, insurance information, and consent forms online before their appointment. This data then integrates seamlessly into your electronic health record (EHR) system, ensuring accuracy, saving time, and making the check-in process far more efficient.
How do I connect automated intake to my EHR safely?
To securely integrate automated patient intake with your EHR, it's essential to use HIPAA-compliant API connectors. These connectors ensure that data is mapped and transferred securely. They rely on a protected cloud infrastructure and maintain audit trails, which are crucial for meeting compliance requirements.
The process typically involves a few key steps: auditing your EHR's API capabilities, mapping the necessary data fields, and creating a secure data pipeline. This setup not only automates data transfers but also minimizes manual errors while safeguarding sensitive patient information.
Which metrics prove automated registration is working?
Key metrics to monitor are registration error rate, first-pass claim acceptance, accounts receivable (A/R) days, and patient satisfaction scores. These metrics provide insight into how well the automated registration process is working, including its accuracy, efficiency, and influence on both the patient experience and the overall performance of the revenue cycle.